Peeling paint looks harmless until it starts flying into the air, clogging sandpaper, or sticking to your shoes. If you need to remove old paint, the best method depends on two things, the surface under it and the condition of the paint itself.
Some jobs need a scraper and patience. Others call for a heat gun, a chemical stripper, or mechanical prep. Start slow, work safely, and match the method to the material.
Start with safety, surface type, and paint age
Before you touch the paint, figure out what you’re working on. Wood dents easily, metal can rust, and masonry holds paint deep in its pores. A method that works on trim can ruin a garage slab.
Older homes need extra care. If the house was built before 1978, assume the paint may contain lead until a test says otherwise. Sanding or heating lead paint can spread dangerous dust and fumes fast.
If you suspect lead-based paint, stop DIY removal and use lead-safe methods or a certified pro.
Good safety gear matters because paint removal gets messy fast. Keep these basics on hand:
- Safety glasses, gloves, and long sleeves
- A respirator rated for dust or fumes, based on the method
- Plastic sheeting, drop cloths, and painter’s tape
- A HEPA vacuum, trash bags, and clean rags
- Scrapers, sanding tools, a heat gun, or stripper, based on the job
Ventilation also matters. Open windows, run fans outward, and keep kids and pets away. For indoor work, control dust at the source. Wet methods help. A HEPA vacuum helps more.
Pick the right method for the surface
This quick comparison makes the choice easier:
| Method | Best use | Pros | Drawbacks |
|---|---|---|---|
| Scraping | Loose or flaking paint | Cheap, precise, low setup | Slow, can gouge soft wood |
| Sanding | Feathering edges, leftover paint, concrete paint | Smooth finish, good prep for repainting | Creates dust |
| Heat gun | Thick paint on wood, some metal | Softens paint without soaking surface | Fire risk, bad choice for lead |
| Chemical stripper | Detailed trim, metal, masonry | Reaches crevices, less abrasion | Messy, fumes, cleanup takes time |
For wood, start with scraping, then sand the edges smooth. A heat gun works well on thick layers, especially on doors and trim. Chemical stripper is often best for carved details because sandpaper misses corners. Go easy, because aggressive sanding can scar the grain.
For metal, use a scraper or wire brush first. Then sand or use stripper for stubborn spots. Heat can work, but thin metal may warp if you linger too long. Once the paint is off, deal with rust before priming.
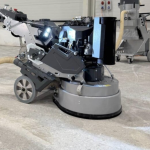
For masonry and concrete, paint removal is harder because the coating sinks into pores. Scraping alone rarely gets it all. Sanding, grinding, blasting, or a masonry-safe stripper usually works better. On painted slabs, the prep method affects what can go on next. This guide to shot blasting vs grinding helps explain why some concrete surfaces need a more aggressive profile.
A garage floor is a good example. Paint may look stuck until a tire turns hot and lifts it. That’s why old floor paint often needs full mechanical prep before a new finish.
A simple step-by-step process that works
First, do a small test patch. Try the least aggressive method that makes sense for the surface. If scraping removes the loose paint cleanly, start there. If nothing moves, step up to heat, sanding, or stripper.
Next, protect the area. Cover nearby floors, tape off trim, and set up ventilation. Put on your PPE before you begin, not after dust starts flying.
Then remove the paint in stages. Scrape at a low angle. Keep the heat gun moving. Let stripper sit for the full dwell time on the label. With sanding, don’t grind in one spot long enough to burn wood or polish metal smooth.
After that, clean as you go. Vacuum chips and dust often. Wet-wipe hard surfaces if lead is a concern. If you use chemical stripper, collect the softened paint and sludge in a container lined with heavy-duty plastic.
A few cleanup rules matter:
- Don’t pour stripper residue down the drain.
- Don’t burn paint chips.
- Bag debris and follow local disposal rules.
- Treat any lead-suspect waste with extra caution.
Finally, inspect the surface in raking light. Leftover paint hides in corners, joints, and pores. A second pass is common, especially on concrete and rough masonry.
Prep the bare surface before you apply a new finish
Paint removal isn’t the finish line. The new coating only sticks as well as the prep below it.
Wood should feel smooth, dry, and free of dust. Spot-prime bare areas, then use the right primer for the topcoat. Metal needs a final wipe-down and, if needed, a rust-inhibiting primer. Masonry should be dry, clean, and free of powder, chalk, or failed paint.
If you’re working on a slab, good concrete dealing starts with the slab itself, not the coating bucket. Old paint left in the pores can ruin bond strength. So can moisture. That’s why a future basement concrete coating or commercial concrete epoxy coating needs more than a quick sweep.
If you want a tougher floor after removal, read about concrete epoxy coating. A proper epoxy coating for concrete needs a clean, open surface. For garages, many installers use an epoxy coating for garage floor and add a polyaspartic coating on top for wear and UV stability. Any garage floor epoxy coating company worth hiring should talk about prep first, not color first.
Some owners skip paint and choose concrete staining or concrete polishing instead, because those finishes don’t peel like surface paint. Before any slab gets sealed, coated, or stained, check moisture. This article on concrete moisture testing is a smart next step.
Old paint rarely comes off with one magic trick. The safer path is to match the method to the surface, control dust, and take lead risk seriously.
Done right, paint removal sets up the next finish to last. Done in a rush, it often means doing the whole job twice.
Comments are closed