A concrete floor can be a workhorse or a headache. The finish you choose decides which one you live with.
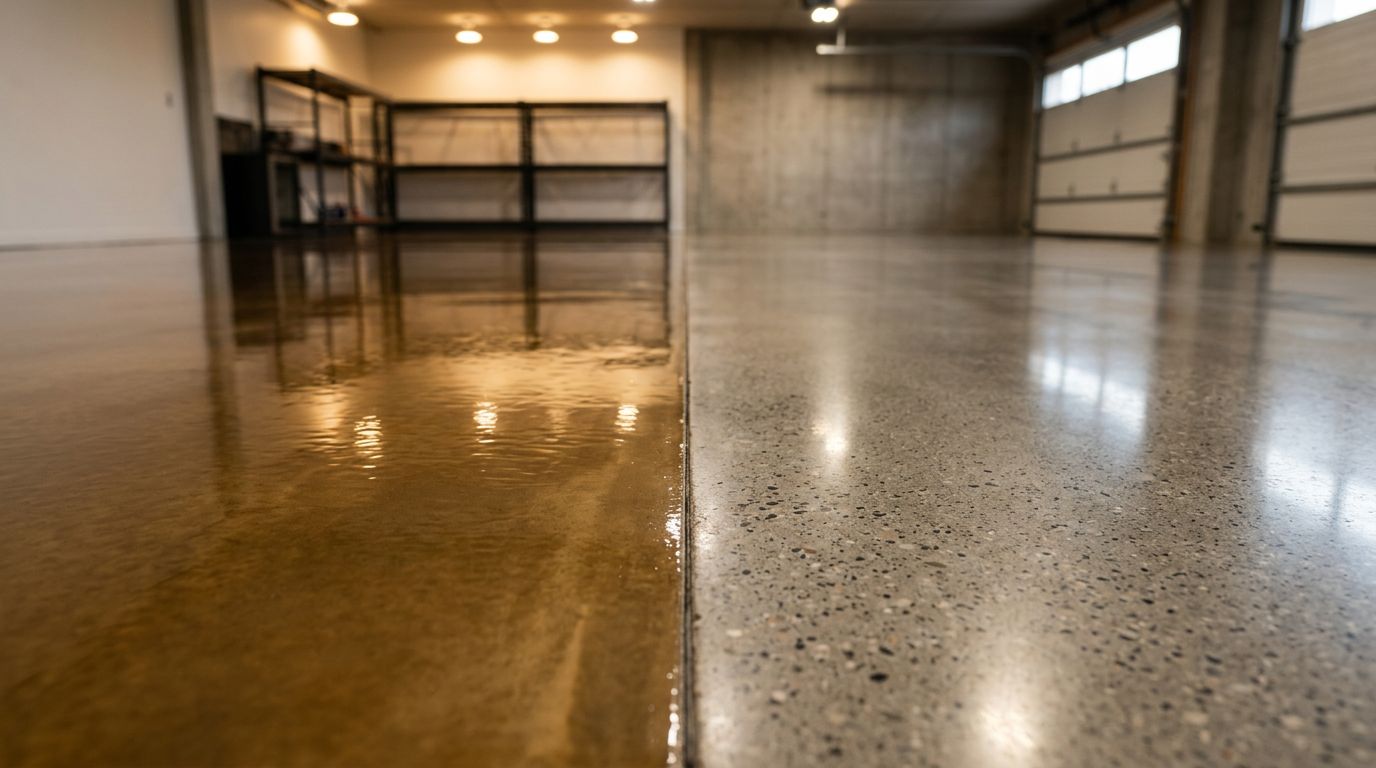
If you’re weighing concrete epoxy vs polishing, here’s the simple truth: epoxy adds a protective layer on top of the slab, while polishing upgrades the slab itself. Both can look sharp. Both can last. They just fail in different ways, and that matters in garages, basements, and busy commercial spaces.
This guide compares performance, costs, install steps, common failure modes, and what to ask before you hire anyone.
Concrete epoxy vs polishing: what you’re actually installing
Think of your slab like a wooden table. An epoxy system is like adding a tough countertop coating. Polishing is like sanding and buffing the wood until it shines, then protecting it with a light finish.
Epoxy (a coating system)
A concrete epoxy coating bonds resin and hardener to the surface. Many systems also add a urethane or polyaspartic coating on top for better scratch and UV resistance. Done right, it seals pores, blocks stains, and makes cleaning easy. Done wrong, it can peel.
Polished concrete (a surface refinement)
Concrete polishing uses diamond tools to grind and refine the slab, then a chemical densifier hardens the surface. Many polished floors also get a guard or sealer, especially in retail or restaurants, to help with stains and daily wear.
A quick note on design: both can add color. Epoxy uses pigments and flakes. Polished floors often pair well with concrete staining for a more natural, layered look (then you protect it with a guard or sealer).
For a high-level comparison from a consumer angle, see Angi’s overview of polished concrete vs epoxy floors.
Concrete epoxy coating: where it shines, and what a good install includes
An epoxy coating for concrete is usually the best fit when you want maximum stain resistance and a “sealed” feel. That’s why an epoxy coating for garage floor projects stays so popular: road salt, oil, and tire residue clean up instead of soaking in.
Typical installation steps (professional-grade)
Most long-lasting systems follow the same backbone:
- Inspection and moisture check (especially important for a basement concrete coating).
- Mechanical prep (diamond grinding or shot blasting) to hit the right concrete surface profile (CSP).
- Crack and joint repair (and spall repair if needed).
- Primer coat (often helps bond and reduces pinholes from outgassing).
- Base coat (epoxy), then optional flake broadcast or quartz for traction.
- Topcoat (often urethane or polyaspartic) for wear and chemical resistance.
If you want a deeper dive on systems and where they fit, start with this page on concrete epoxy coating.
Best choice if…
Epoxy is usually the best pick if you want a sealed surface and fast cleanup:
- You park hot tires daily and want stain resistance (with the right topcoat).
- You run a shop, clinic, or warehouse that needs commercial concrete epoxy coating performance.
- You want decorative flakes or a more “finished room” look in a garage.
On the other hand, if moisture risk is high and you can’t mitigate it, polishing may be safer long-term.
Concrete polishing: the low-peel option with a different upkeep style

Photo by Jan van der Wolf
Polishing is appealing because there’s no thick film to peel. You’re improving what’s already there. That can be a big deal in sunlit spaces or areas that see constant traffic.
Typical installation steps (polish and protect)
A standard polished system usually includes:
- Progressive diamond grinding (to flatten and remove weak surface paste).
- Densifier application (often lithium or sodium silicate) to harden the surface.
- Polishing passes to reach the target sheen (matte to high gloss).
- Guard or sealer (optional but common), then burnishing to improve stain resistance.
Polished concrete still needs smart cleaning. Grit acts like sandpaper, so entry mats and routine dust mopping matter more than most people expect.
Best choice if…
Polishing is often the best fit when you want durability with fewer coating-related failures:
- You want a clean, modern look for retail, showrooms, or offices.
- You expect sun exposure and don’t want yellowing concerns.
- You prefer a finish that can be refreshed with guard and burnishing instead of recoating.
It’s not always ideal in a garage that sees frequent chemical spills, unless you add the right protective guard and keep up with cleaning.
Pros, cons, costs, and common failure modes (plus how to prevent them)
This table summarizes the practical tradeoffs most homeowners and facility managers care about:
| Category | Epoxy coating system | Polished concrete system |
|---|---|---|
| Biggest strength | Seals the slab against many stains and chemicals | No peelable film, strong abrasion resistance |
| Common downside | Can delaminate if prep or moisture control is wrong | Can scratch or dull in traffic lanes, especially at high gloss |
| Best look | Solid color, flake, metallic effects | Natural concrete, exposure of aggregate, stain-dyed looks |
| Moisture sensitivity | Higher risk if moisture vapor is high | Usually more tolerant, but guards and sealers can haze if moisture is excessive |
| Residential cost (ballpark) | Often about $5 to $12 per sq ft, varies by prep and design | Often about $3 to $10 per sq ft, depends on grind level and gloss |
| Commercial cost (ballpark) | Often about $4 to $12+ per sq ft, driven by thickness and downtime | Often about $3 to $8+ per sq ft, driven by size and flatness needs |
Costs swing by region, slab condition, repairs, and access. Old glue, oil-soaked concrete, or joint spalling can change the whole scope.
Failure modes you should plan around
A few problems show up again and again:
Hot-tire pickup (epoxy): Warm tires can soften lower-grade top layers. Prevention: use a proven topcoat, often polyaspartic or urethane, and hit the right film build.
Delamination from moisture (epoxy): Vapor pressure pushes the coating off. Prevention: concrete moisture testing and a system rated for the measured results. For a clear explanation of RH probes vs calcium chloride, see concrete moisture testing.
Scratches and dulling (polishing and coatings): Grit is the culprit. Prevention: entry mats, frequent dust mopping, and the right cleaners. Avoid harsh degreasers and acids unless the manufacturer allows them.
Joint spalling (both): Joints chip from traffic and impacts. Prevention: proper joint fill, load-rated repair materials, and keeping hard wheels off failing edges. Good concrete dealing during repairs (sequencing, cure times, and joint details) prevents call-backs later.
If someone skips mechanical prep or moisture testing, you’re not buying a floor, you’re buying a gamble.
DIY vs hiring a pro, plus a contractor question checklist
DIY kits can look tempting. Still, the hard part isn’t rolling on product. The hard part is diagnosing the slab and prepping it right. That’s why many owners use a garage floor epoxy coating company for garages, and a polishing crew with commercial grinders for big spaces.
Safety matters either way. Grinding creates silica dust, so pros use dust collection and proper PPE. Coatings can also release odors and VOCs, so ask about ventilation and low-VOC options.
Before you sign, ask these questions and get the answers in writing:
- Which moisture tests will you run (ASTM F2170 RH probes, ASTM F1869 calcium chloride), and will you share raw results?
- What CSP target will you prep to, and will you grind or shot blast?
- How many coats, and what total film build will the system reach?
- What topcoat will you use (urethane or polyaspartic), and why?
- What slip-resistance options are available (additives, flake, satin finish), and what changes cleaning?
- What does the warranty cover (peeling, hot-tire pickup, yellowing), and what voids it?
- Which cleaners are approved, and what should you never use?
For another side-by-side perspective, Garage Floor Coating Finder’s breakdown of polished concrete vs epoxy coating is a helpful cross-check.
Conclusion: picking the right finish comes down to risk, not hype
Epoxy wins when you need a sealed, chemical-resistant surface and you control prep and moisture. Polishing wins when you want a long-wearing floor with fewer coating-related failures. In both cases, prep and testing decide the outcome more than the brand name on the bucket.
If you’re still torn, start with the slab: moisture, damage, and how you’ll use the space. The right choice should feel boring on day 300, because it’s still doing its job.
Comments are closed