
Concrete looks rock-solid, but it moves all the time. Heat makes it expand, cold makes it shrink, moisture comes and goes, and the ground can shift a little each season. That movement sounds small, yet it adds up across a wide garage, a long patio, or a busy showroom.
That’s why concrete expansion joints matter, especially if you’re planning an epoxy coating, polishing, or stain. The right joints help prevent random cracks, trip hazards, and those “mystery lines” that show up through a finished floor. In this guide, you’ll learn where joints belong, what a good joint should look like, and how to handle joints so your new finish stays clean and bonded.
Expansion joints vs control joints, what’s the difference and why it matters
People mix these terms up because both are “lines in the slab.” Still, they do different jobs.
Control joints (also called contraction joints) are planned weak lines. Concrete shrinks as it cures, so it wants to crack. A control joint basically says, “Crack here, not wherever you feel like it.” These joints are typically saw-cut or tooled into the surface soon after the pour.
Expansion joints (often called isolation joints) are true movement gaps. They separate sections of concrete, or separate a slab from something that won’t move the same way (like a foundation wall or a column). They’re usually full-depth and include a compressible filler, often topped with a flexible sealant to keep out water and grit.
Here’s the practical takeaway: control joints manage shrinkage cracking, while expansion joints handle bigger movement from temperature swings, loads, and settling. If you choose the wrong type, or skip them, the slab still moves. It just does it by cracking wherever stress builds, and those cracks can telegraph right through coatings.
To keep the terms straight, this quick table helps.
| Joint type | What it does | Typical look | Common width range |
|---|---|---|---|
| Control joint | Guides shrinkage cracks | Saw-cut groove in the slab | About 1/8 to 1/4 inch |
| Expansion joint | Allows sections to move apart | Full-depth gap with compressible filler and flexible sealant | About 3/8 to 1/2 inch (often) |
If a “joint” is filled with a hard patch that can’t flex, it’s not acting like an expansion joint anymore.
What causes slab movement in real life (temperature, moisture, loads, and soil)
In garages, the biggest temperature swing often hits right at the door. Sun bakes the first few feet of slab, while the back stays cooler. That push-pull can open joints and stress corners.
Basements have a different problem. Even when the surface feels dry, moisture vapor can move up through concrete. Then the room’s humidity changes by season. As a result, the slab can expand and contract in tiny cycles, and those cycles keep working on the same weak spots.
Loads add another layer. A parked SUV, a rolling tool chest, or a forklift wheel puts weight into a small area. If the slab can’t “give” at joints, it may crack next to a wall, at a column, or across a doorway where the slab is already stressed.
Soil matters too, especially in areas with clay. When soil swells after rain and shrinks in dry periods, it nudges the slab. That’s why joints near edges and transitions usually need the most respect.
A fast rule of thumb for homeowners and facility managers
Think of concrete like a big sheet of glass. The larger it is, the more it needs planned “break lines” so it doesn’t shatter in random places.
A few simple cues help:
- Large, uninterrupted slabs need a joint plan, not wishful thinking.
- Edges and transitions (walls, doorways, steps, and columns) need movement room first.
- Random cracks often mean joints were missing, cut late, or placed poorly.
Spacing varies by slab thickness, climate, and loads. Still, many slabs follow a common guideline where control joint spacing lands around 2 to 3 times the slab thickness in feet (for example, a 4-inch slab often gets joints around 8 to 12 feet apart). Exterior slabs are often tighter, because sun and weather drive more movement.
Where you need expansion joints in garages, basements, patios, and commercial floors
Expansion joints aren’t about making concrete “crack-proof.” They’re about choosing where movement can happen without damaging the slab or the finish.
Start with stress points, then fill in the grid. The most common high-stress spots include inside corners (re-entrant corners), around columns, at long runs, at slab thickness changes, and where a slab meets something rigid. If your floor will be coated, joint placement also affects how clean the final layout looks, because joint lines tend to stay visible.
For control joints, it’s also timing. Saw them early, often within the first day, so the slab cracks on your terms. Once a random crack forms, you can repair it, but you can’t un-crack it.
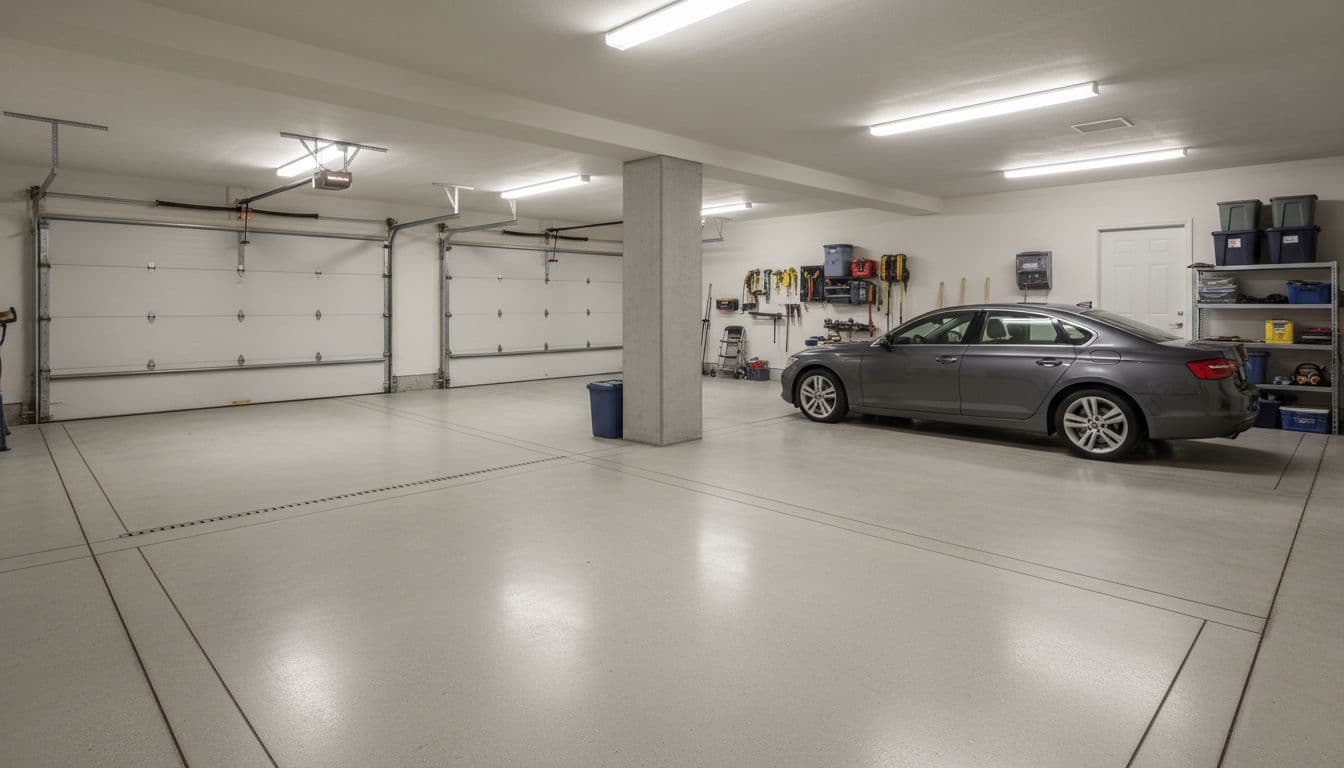
Garages and basements, edges, columns, and big open bays
In garages, expansion joints often show up where the slab meets the foundation wall, and where it wraps around posts or columns. Those spots act like “anchors.” When the slab wants to move, it pulls against them and cracks nearby unless it has room to separate.
Wide open bays need planning too. A big rectangle of concrete tends to crack across its shortest path, like tearing a sheet of paper by pulling from both ends. Control joints help by creating straight “release lines” before stress builds.
Pay extra attention near the garage door and the driveway transition. That zone sees the most sun, the most water, and the most temperature swings. If any part of a garage floor is going to open up, it’s often there.
Patios and outdoor slabs, doors, steps, and sun-baked sections
Outdoor concrete lives a harder life because weather changes faster than indoor air. One part of a patio might sit in full sun while another stays shaded. Then a summer storm hits and cools the surface fast. That cycle repeats for years.
Because of that, patios often benefit from more frequent joints than protected interior slabs. You’ll commonly see joints placed:
- At long runs and large rectangles, so panels stay closer to square
- Near doors and thresholds, where the slab meets the house
- Around posts, piers, and stair landings
- At changes in direction or width, which concentrate stress
If your patio will be stained or sealed, clean joint lines matter even more. A messy joint can catch water and dirt, and it’ll stand out once you add color.
Showrooms, warehouses, and retail, planning joints around traffic and looks
Commercial floors have two extra pressures: wheels and visibility.
Pallet jacks, lifts, and rolling carts don’t like uneven joints. When joint edges chip or sit at different heights, you get wheel chatter, faster wear, and higher trip risk. For that reason, commercial joints are often designed to stay tight, straight, and flush.
Appearance also matters in retail and showrooms. Joint layout can make a floor look intentional, or it can look like an afterthought. Many facilities align joints with aisle lines, doorways, and column grids, so the pattern feels “planned,” even when it’s doing serious structural work.
If you’re coating a commercial slab, joint condition becomes part of the spec. A coating system can only look as smooth as what’s under it, and bad joints tend to broadcast through glossy finishes.
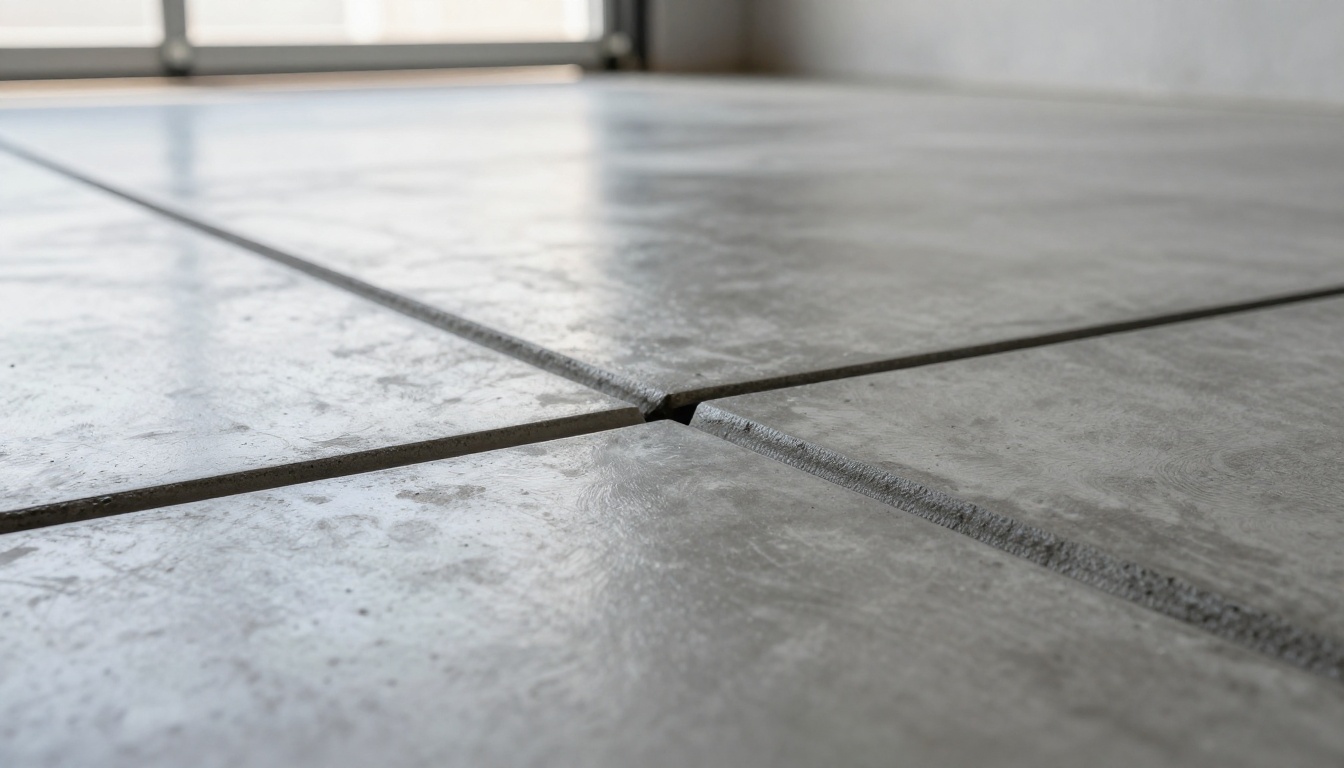
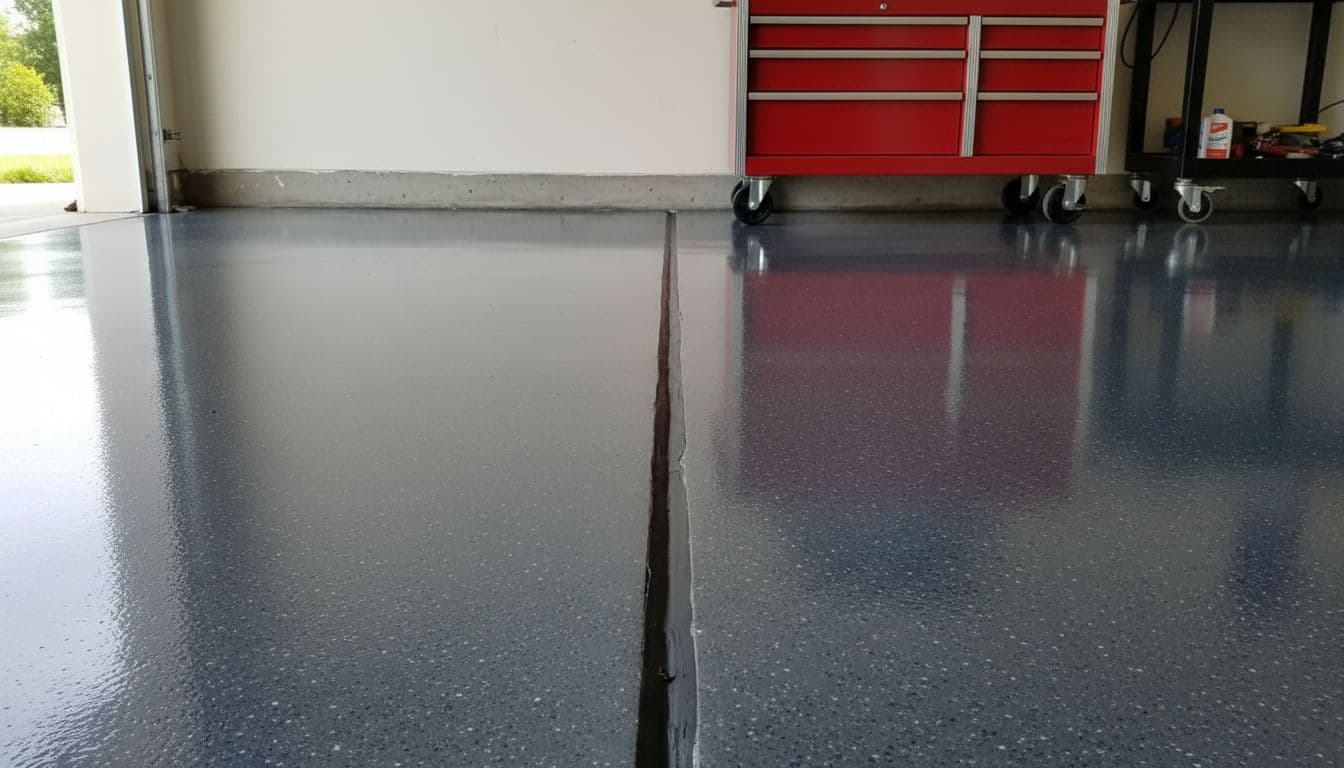
How expansion joints should look on a finished floor (and what “bad” looks like)
A good expansion joint is boring, in the best way. It’s straight, consistent, and easy to clean. It also stays flexible, because movement never stops.
In many slabs, expansion joints are commonly around 3/8 to 1/2 inch wide, although larger commercial slabs may use wider joints. What matters most is not chasing a magic number, it’s matching the joint design to expected movement, then sealing it correctly so the edges don’t crumble.
Depth matters too. A joint that’s too shallow can’t do its job. A joint that’s filled with the wrong material can turn into a rigid plug. Either way, the stress has to go somewhere, and it often shows up as spalling edges, cracked coatings, or jagged cracks crossing the floor.
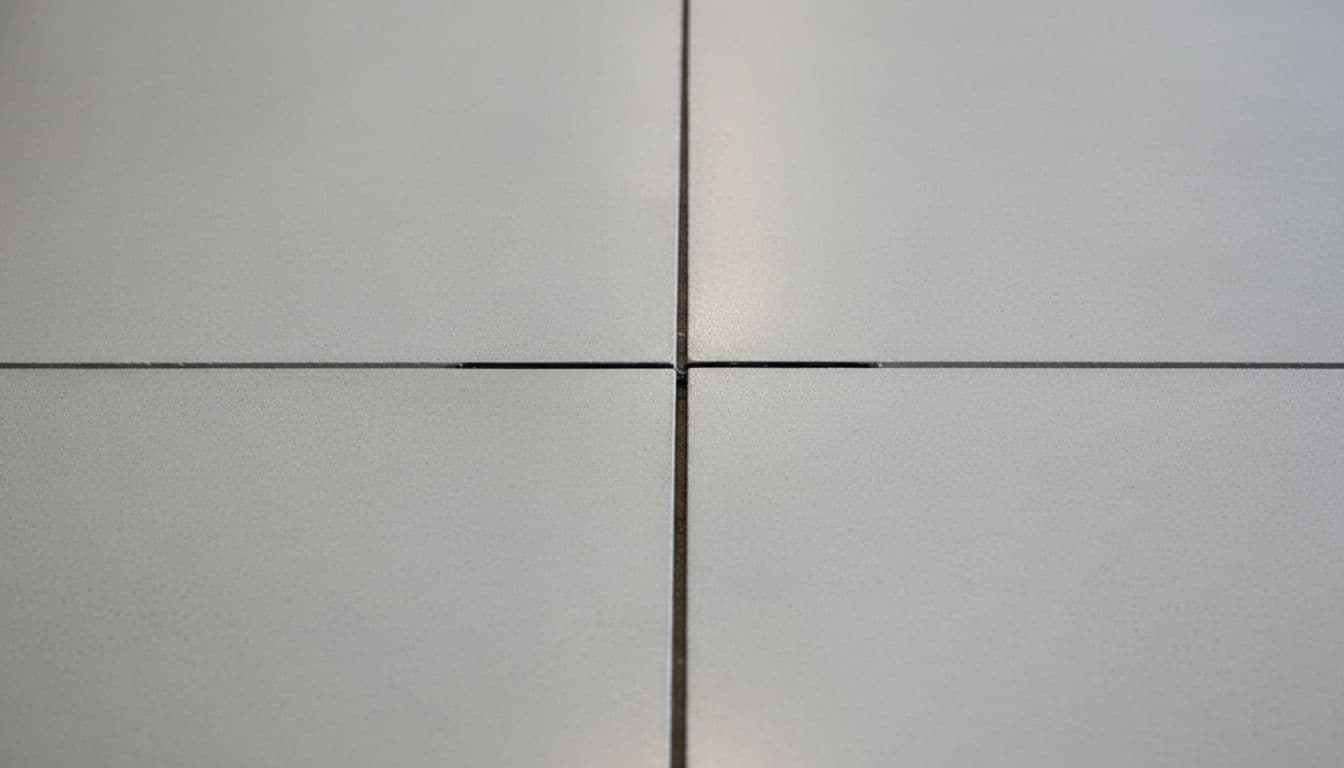
The “good joint” checklist: straight lines, clean edges, flexible fill, flush finish
Use this as a quick visual check before you pay for a new finish:
- Straight and consistent: The joint doesn’t wander, widen, or pinch tight.
- Clean, solid edges: No crumbling concrete, no exposed aggregate breaking loose.
- Flexible fill: The joint isn’t packed with rigid mortar or a brittle patch.
- Flush finish: The sealant sits even with the floor, not a hump and not a deep trough.
- No gaps at the sides: Sealant hasn’t pulled away from the concrete.
When you plan epoxy or polish, a neat joint line is like a clean caulk line in a bathroom. You might still notice it, but it looks crisp, not messy.
Common problems to spot early: spalling, lifted edges, debris-filled gaps, and cracks that cross the joint
Joint problems usually start small, then snowball.
Spalling (chipped edges) often comes from wheels, impacts, or a joint that wasn’t protected. Once edges break, they keep breaking, and coatings near the joint can lose support.
Lifted edges can point to slab movement or poor base support. It’s also a trip hazard, and it can cause hard-wheeled carts to hit the joint like a speed bump.
Debris-filled gaps sound harmless, but trapped grit acts like sandpaper. It can also block movement, which defeats the joint’s purpose.
Cracks crossing the joint are a warning sign. That can mean the joint wasn’t deep enough, was cut too late, or the slab is moving in a way the joint layout didn’t anticipate.
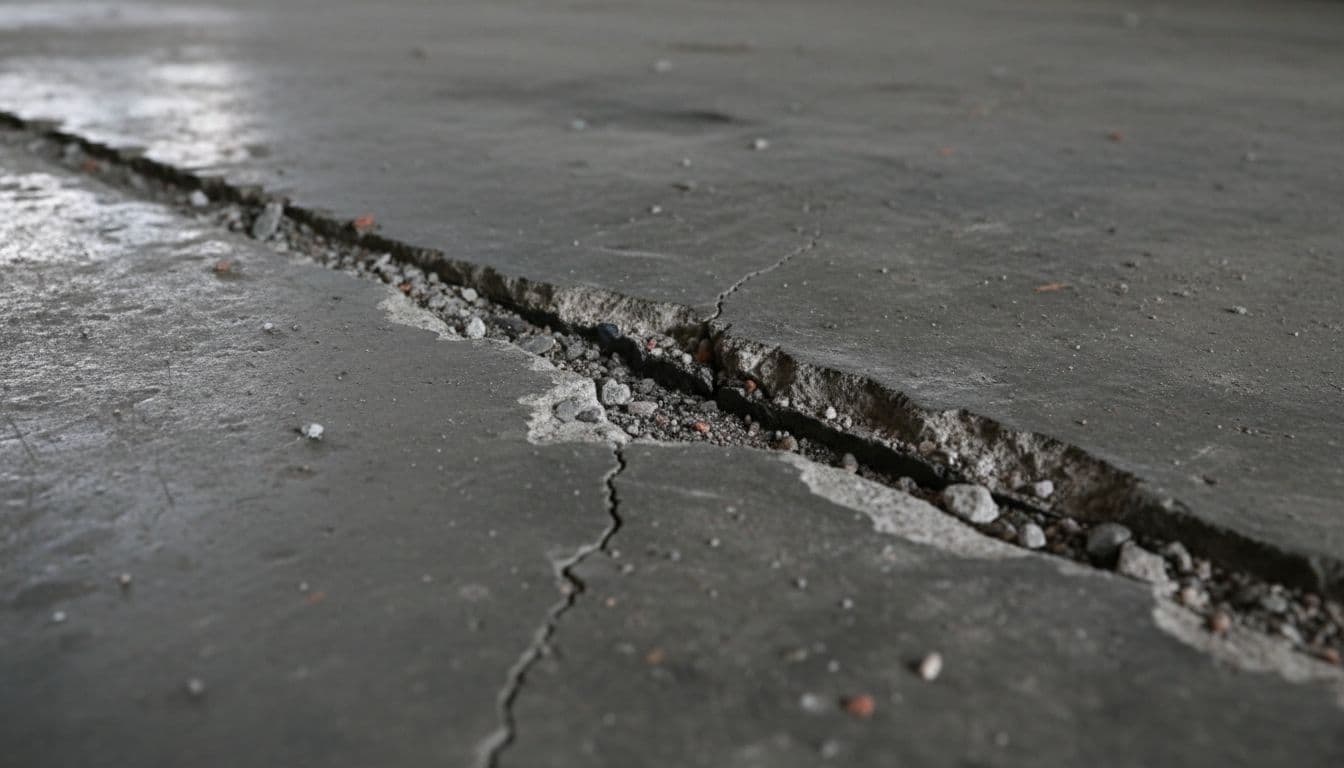
If you catch these early, cleaning and re-sealing may be enough. On the other hand, if edges are breaking or heights are uneven, it’s smart to bring in a pro before you coat. Coatings don’t “hide” joint failures, they highlight them.
Coatings and joints, how to avoid cracking, peeling, and ugly lines
Joints and coatings can work together, but only if you respect one rule: active joints must stay flexible. In other words, don’t lock a moving gap under a rigid finish and hope it behaves.
Planning helps a lot. Before installing a new finish, you want to decide which joints get flexible sealant, which cracks get repaired, and which lines you want to keep visible for a clean layout. Joint prep also affects adhesion. Dust, oil, and old soft fillers can all keep a coating from bonding at the edges.
If you’re considering a full system, this is also a good time to compare finish types. Epoxy, polished concrete, and stain each treat joint lines differently, and the “best” look depends on whether you want a seamless shine or a more natural concrete style.
If you’re installing epoxy, don’t trap movement under a rigid coating
Epoxy cures hard. That’s a big part of why it resists stains and tire marks, but it also means epoxy doesn’t like movement. If you bridge an active expansion joint with epoxy, the coating often cracks right on that seam. Sometimes it chips. Sometimes it peels at the joint edge. Either way, the joint wins.
A safer high-level approach looks like this: clean and prep the joint, use the right backer material if needed, then apply a flexible sealant designed for movement. After that, coat up to the joint line instead of locking it shut. Some joint products are made to be top-coated, so compatibility matters.
If you want a deeper breakdown of systems and prep, this guide on concrete epoxy coating explains why most failures come from skipped steps, especially at cracks and joints.
The cleanest epoxy floors usually aren’t the ones with “no joints.” They’re the ones where joints were treated on purpose.
For polished or stained concrete, how to get a cleaner, more “finished” joint line
Polished and stained concrete keep the slab as the main surface, so joint lines read differently than they do under epoxy.
For polished concrete, many owners prefer a joint fill that sits flush and doesn’t smear during grinding. Filling at the right time can help the line look crisp and intentional, not like an open gap that collects dust. If you’re weighing polished concrete for a basement, this comparison of polished concrete vs LVP is a helpful reality check on moisture and long-term upkeep.
For stained concrete, joints can affect how color looks. If a joint is tooled poorly or left dirty, stain can pool along the line and create a darker stripe. Careful cleaning and sealing keeps the joint from becoming a “dirt outline” that never goes away.
In both cases, the goal is the same: keep the joint flexible, keep edges sound, and make the line look planned.
Conclusion
Concrete moves, even when it looks perfectly still, and joints are how you keep that movement from turning into random cracks. Place joints where stress is highest, keep them straight and flexible, and fix edge damage before it spreads. Most importantly, if you’re upgrading with epoxy, polish, or stain, treat joints correctly so the finish doesn’t crack or peel at the seams. If you’re planning a new floor, have the joints inspected and repaired first, because a clean joint line is the difference between a floor that looks “done” and one that always looks patched.
Comments are closed