A crack in concrete can look harmless, like a scratch on a workbench. Then a season changes, the slab shifts a hair, and that “scratch” starts telegraphing through your finish.
The fastest way to waste time and money in concrete crack repair is picking a product before you understand the crack. Some repairs need strength, others need stretch, and a few need both (which usually means changing the detail, not just the material).
This guide is for contractors and serious DIYers choosing between epoxy filler, polyurea (or polyurethane), and cementitious patch. It also connects the repair choice to what comes next, like a concrete epoxy coating, concrete polishing, or concrete staining.
Choose the repair by what the crack is doing, not how it looks
Before you open a cartridge, do a quick read on movement. Mark each side of the crack with a pencil line. Measure the width now, then again after a hot afternoon and after a cold morning. If it opens and closes, treat it like a joint.
Three common field scenarios:
- A garage control joint that opens in winter and tightens in summer. This wants a flexible joint filler (polyurea or polyurethane).
- A settled slab crack that’s mostly done moving and needs load transfer. This often points to epoxy (or sometimes replacement).
- A spalled driveway edge from salt, impact, or thin concrete. This is cement patch territory, assuming you can get to sound substrate.
Standards language helps you explain the “why” to an owner. ACI and ICRI both stress matching material properties to the failure mode, not just “filling the gap.” If you want a deeper selection framework, see ICRI’s material selection guidance in the ICRI concrete surface repair guideline (PDF).
If the crack is moving, a rigid repair is just a delay, not a fix.
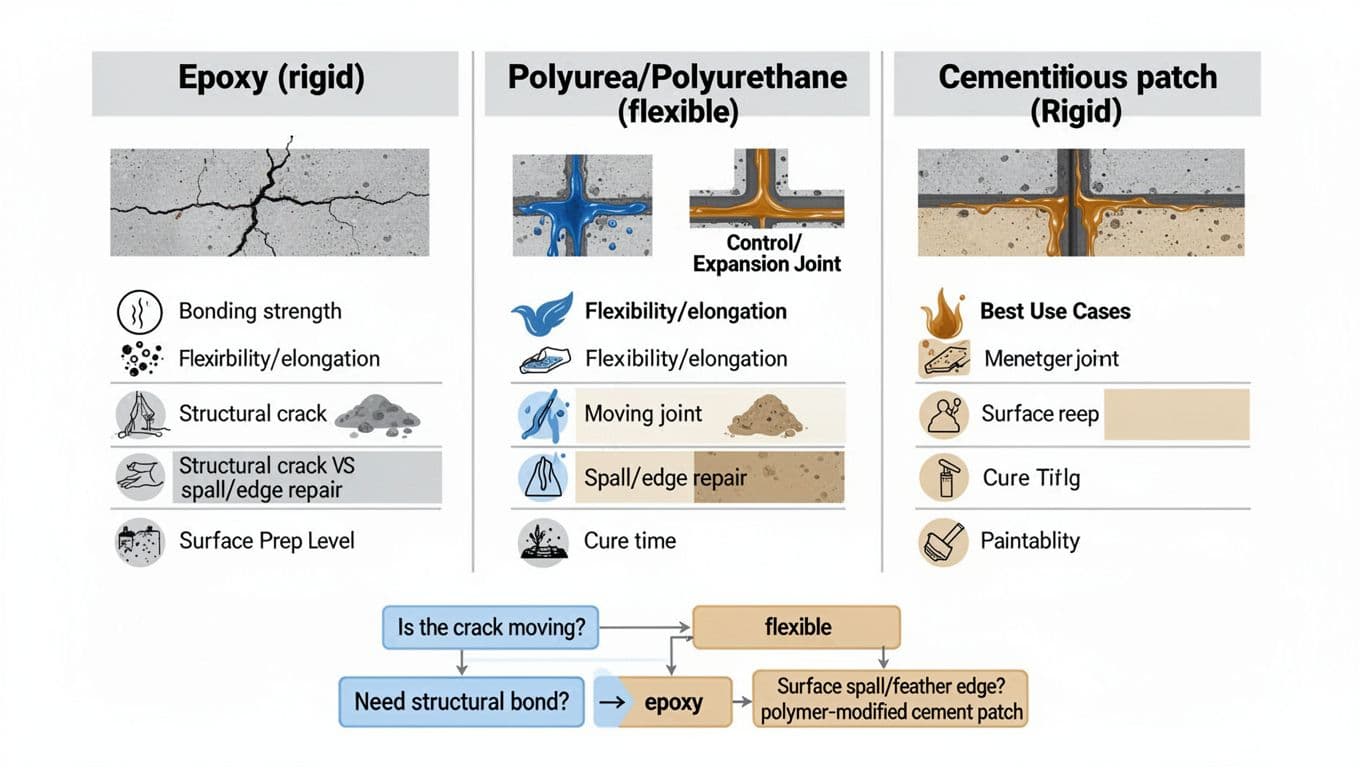
Here’s a quick comparison for jobsite decisions:
| Option | Best for | Handles movement? | Typical cure | Finish compatibility |
|---|---|---|---|---|
| Epoxy filler/injection | Bonding non-moving cracks, restoring monolithic behavior | No | Hours to days | Good under epoxy coating for concrete, paints, many coatings |
| Polyurea (or polyurethane) joint filler | Control joints and cracks that open/close | Yes | Minutes to hours | Works under many floor systems, may need shave/grind |
| Cementitious patch (polymer-modified) | Spalls, broken edges, surface scaling | No | Minutes to days | Can be polished, stained, or coated after proper cure |
For a practical DIY-friendly rundown of crack filling basics, compare your situation to A-1 Concrete’s crack repair methods.
How epoxy, polyurea, and cement patch get installed (prep, placement, finishing, cure)
Epoxy filler and epoxy injection (rigid strength, low forgiveness)
Epoxy is the “welding” option. It bonds hard and strong, but it won’t stretch. That’s why epoxy shines on cracks that have stabilized, especially when you need a tight bond before an epoxy coating for garage floor projects or a commercial concrete epoxy coating where traffic is harsh.
Step-by-step (surface fill or injection logic is the same: clean, dry, bond):
- Prep: Route the crack to remove weak edges (a small V-groove works for surface fills). Vacuum dust, then wipe with a solvent only if the epoxy system allows it. Concrete must be dry; moisture can kill bond.
- Placement: For injection, install ports and seal the surface, then inject low-viscosity epoxy from the lowest port up. For surface fills, mix accurately and press epoxy into the crack.
- Finishing: Tool flush, then broadcast sand if you’ll coat later. Sand gives your next layer bite.
- Cure: Protect from traffic until full cure. Most epoxies prefer moderate temps (often around 60°F to 85°F). Cold slows cure, heat shortens working time.
Safety and constraints: Epoxies can cause skin sensitization. Use nitrile gloves, sleeves, and eye protection. Ventilate indoors, especially in basements. If you’re planning a basement concrete coating, don’t trap solvent odors in a closed space.
For a clear explanation of when epoxy injection fits versus polyurethane injection, see Crack Injection 101 from Concrete Masonry Restoration. Many specs also reference epoxy bonding requirements in standards like ASTM C881 and ACI guidance for bonded repairs.
Polyurea (and polyurethane) joint fillers (flexible, fast, built for movement)
Polyurea is the shock cord. It stretches with the slab, so it’s a top pick for control joints and cracks that act like joints. It also cures fast, which matters when floors can’t sit idle.
This is also where floor systems intersect. A repaired joint often gets shaved flush, then coated with a concrete epoxy coating or a polyaspartic coating system. Many installers prefer polyurea joint filler under a full epoxy coating for concrete because it keeps the joint line clean and reduces edge chipping.
Step-by-step for a garage joint that opens and closes:
- Prep: Sawcut or re-open the joint to create clean walls and consistent depth. Vacuum dust. If the slab is oily, degrease and rinse well.
- Placement: Install backer rod if the joint is deep, then gun the polyurea to avoid three-sided bond. Don’t overfill if you need a flush finish.
- Finishing: Let it set, then shave or grind flush. On polished floors, blend carefully so you don’t leave a low spot that catches light during concrete polishing.
- Cure: Many products return to service quickly, but cure depends on temperature. Cold slows reaction. Heat speeds it up.
Safety and constraints: Some joint fillers have strong odor, and isocyanate exposure is a concern for certain polyurethane chemistries. Wear gloves, eye protection, and keep airflow moving.
For a plain-English comparison of where polyurea fits against epoxy for cracks, see polyurea vs epoxy for crack repair.
Cementitious patch (rigid repair for spalls, edges, and surface loss)
Cement patch is your trowel-and-feather option, but only when you do it right. It’s ideal for spalled edges, pop-outs, and scaling, especially on exterior slabs that are concrete dealing with freeze-thaw and deicing salts.
Step-by-step for a spalled driveway edge:
- Prep: Chip back to sound concrete with square shoulders when possible. Remove dust completely. Rusty rebar needs cleaning and corrosion plan if exposed.
- Placement: Pre-wet the substrate to SSD (damp but no standing water). Pack the repair mortar tight to avoid voids. Polymer-modified mixes help, and rapid-setting mortars often follow ASTM C928.
- Finishing: Don’t overwork the surface. Match texture early, then leave it alone.
- Cure: Protect from sun, wind, and freezing. Many patches fail because they dry too fast.
If the owner wants decorative work later, plan the sequence. Patches can telegraph under concrete staining, and they can show during concrete polishing. For coatings, wait for moisture to stabilize so an epoxy coating for concrete doesn’t blister.
Mistakes to avoid (plus quick FAQ)
Most callbacks come from the same few misses:
- Filling moving joints with epoxy: It cracks again, often right beside the repair.
- Skipping crack prep: Dust is a bond breaker, every time.
- Feather-edging cement patch to nothing: Thin edges dry fast and debond.
- Coating too soon: Trapped moisture can blister a concrete epoxy coating.
- Ignoring joint design: Three-sided bond turns a flexible joint filler into a tear point.
A repair that looks flush on day one can still be wrong underneath.
FAQ
Can you use epoxy on moving joints?
Not as a long-term joint solution. Epoxy is rigid, so movement will re-crack the line or the slab edge. Use a flexible polyurea or polyurethane joint filler, or re-detail the joint.
Can polyurea be sanded or painted?
Yes, in many cases. After it cures, you can shave, grind, or sand it flush. Painting varies by product, and coatings may need scuffing for adhesion. If you’re doing an epoxy coating for garage floor, most installers shave flush and coat over it.
When will cement patch debond?
Cement patch fails when the substrate is weak, dirty, too smooth, or too dry. Debonding also shows up when the slab moves, when the patch is feather-edged too thin, or when cure conditions are harsh (wind, sun, freezing). For deep or structural loss, replacement can be smarter, as discussed in epoxy vs polyurethane vs replacement decisions.
Conclusion
Good concrete crack repair is less about the product label and more about matching the material to movement, moisture, and the finish plan. Use epoxy when you need a rigid bond, polyurea when the joint must move, and cement patch when you’re rebuilding missing concrete. When the next step is an epoxy coating for concrete or you’re hiring a garage floor epoxy coating company, the repair detail decides whether that finish lasts.
Comments are closed